|
Do you want to be a better CNC'er in 37 Seconds? Get Better Tool Life, Surface Finish, and Material Removal Rates Fast. It's that easy. You can install and get results now. |
RF-45 Mill Fine Tramming Adjustment
Tramming is an important and frequent task for any mill whose head will swivel. I probably tram my Industrial Hobbies RF-45 style mill about every fourth or fifth time I am in the shop, and it always needs a little tweak. These mills can be a little bit twitchy to tram because the head is very heavy, wants to "nod" forward as you loosen the tramming lock bolts, and once loose, it is hard to move just a little bit. As you tighten back up, it will typically move a little as well. Sicne it is hard to move, I have typically used a prybar stuck in one of the holes to gain a little leverage from which to tap the head gently into tram. I use an SPI "traminator" double indicator tool to measure the tram:
Wrench, prybar, and "Traminator" gauge...
It's not hard to tram the mill this way, but it certainly doesn't seem a very precision approach and can be a bit trial and error.
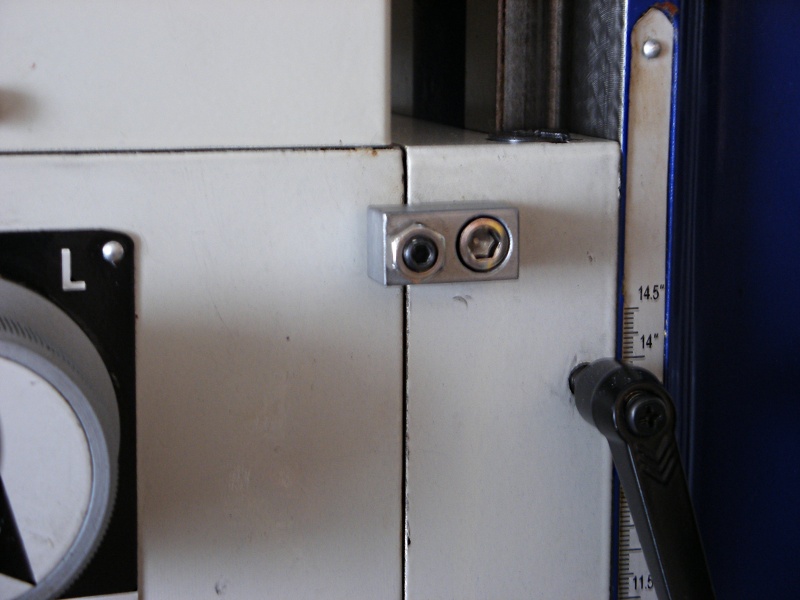
Along came a great idea that MachineChick published on CNCZone:

That little setscrew with locknut will apply pressure to the top of the head causing it to pivot smoothly. Makes tramming the head faster, easier, and more precise. I would think it might help hold the head in place a little better too. Mount one on either side so the head can be pushed either way.
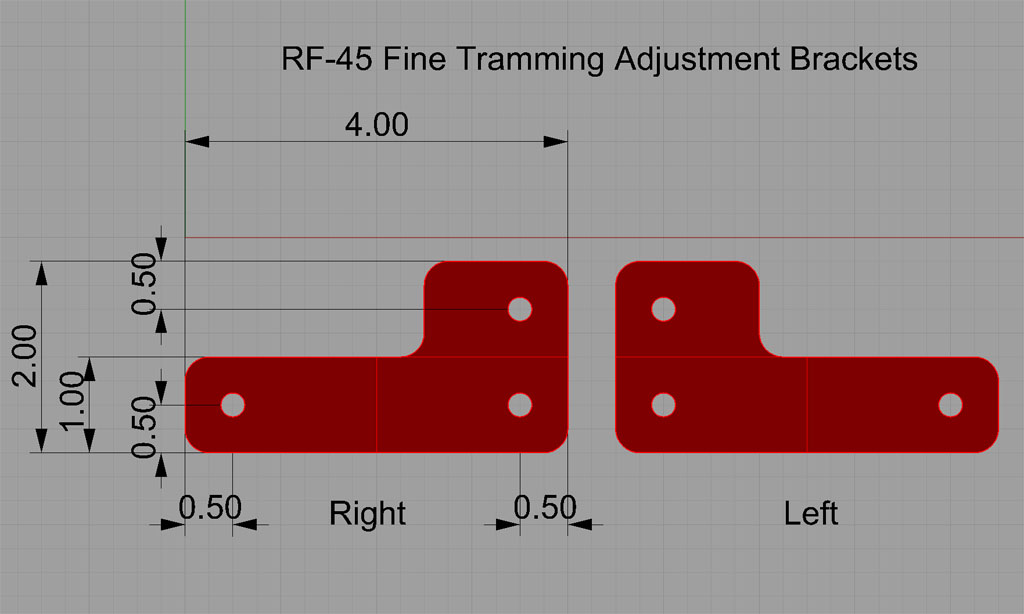
Now the version MachineChick made is for a different mill and won't work on the RF-45. The reason is that the head doesn't fit quite that way to the Z-axis saddle. So, I drew up a variation that I intend to use:

It should be easy to knock out a couple of those brackets with a 1/2" endmill under CNC. I'm going to use some 3" wide by 3/4" thick 6061 stock I have in hand. The bolts are 1/4-20's, which is one of the staples at my shop. The two bolt holes near one another are clearance holes for bolts that will be threaded into the saddle to hold the brackets. The hole at the tip of the adjustment bracket is threaded and holds the adjustment screw. I'll use a socket head cap screw with jam nuts so I can lock down the bolt once the tram is where I want it.
I plan to make the parts in the vise, and will cut them down to a thickness of 0.65" leaving 0.100" backing plate. I'll then flip the part and face mill the backing off. I need to make 2 mirror image parts, so there will be two g-code programs. The reason is I want to run a chamfer pass to break the rough edges and that chamfer pass happens on opposite sides for the left and right.
Okay, here is the process:
1. Rough cut two pieces of 3" wide aluminum 6061 stock to 4 1/4" lengths.
2. Insert in vise. I will embed the part in the aluminum such that there is 1/8" clearance all the way around so all edges will be milled.
3. Facemill to get a nice finish. 20 thou depth of cut, 1600 rpm, 30 IPM with my Glacern 3" 45 degee facemill.
4. Drill 2 x 1/4" diameter clearance holes. These are through holes, so depth of cut will be 0.800". I'm going to use an "I" drill (0.272").
5. Drill the one hole to be threaded 1/4-20. I will use a #4 or #5 (0.209 - 0.2055") twist drill for an approximately 65% thread after tapping. The holes will be drilled at 1600 rpm with a feedrate of 5 IPM and a peck drilling cycle.
6. Countersink the 2 holes with an interpolated hole using a 1/4" 2 flute endmill. Feedrate is 20 IPM at 1600 rpm.
7. Profile to 0.650" depth with a 4 flute roughing endmill. I'm going to clear all the aluminum so that I'm not slotting (too many flutes, but I can go faster with 4 than 2) and I will use a roughing ("corncob") endmill on a roughing pass followed by a finish pass with a 4-flute just like I did on the upright brackets of my tapping arm. The roughing feed will be 50 IPM at 1600 rpm, depth of cut 0.400" and width of cut 0.125" so we can get some chip thinning speed. To avoid slotting, I will tell OneCNC I have to remove 1" of material. This will result in air being cut anywhere the edge of the part is more than 1" from the edge of material, but it doesn't take long to cut the air and it doesn't shorten tool life appreciably (LOL). I will leave a finish allowance of 0.015" and use the same 50 IPM feed at 1600 rpm for the finishing pass.
8. Chamfer holes and edges with a 1/2" spotting drill (they work pretty well if you don't have a true chamfer tool handy, I don't!). For chamfering, I will use a 5 IPM feedrate at 1600 rpm. Depth of cut will be 0.010".
9. While I have the spotting drill in the machine, I will engrave the CNCCookbook logo. Same feeds and speeds as chamfering.
10. Flip the part and facemill circa 0.150" off so the backing plate goes away. For facemilling, I will cut in 5 passes of 0.030" and will be using my 3" 45 degree Glacern facemill. The cuts have to be kept shallow because facemills use quite a lot of horsepower. Feed will be 75 IPM at 1600 rpm.
11. Set the parts on end in the vise so the long edge is at the top. Use the 1/2" finishing endmill to put a slight relief (0.100") in 2" of the narrow edge. This provides a little clearance so the bracket itself doesn't hold the head from moving. I will use a 30 IPM feedrate at 1600 rpm and cut the whole 1" depth in a single pass.
There are two parts to be run this way. Here is the g-code:
Right Bracket G-Code:
1. Facemill Top of Bracket: Z zero is top of the workpiece, so this cut goes to z = -0.020. Uses Glacern 3" 45 degree face mill. 1600 rpm, 30 IPM.
2. Clearance Holes: Re-zero so top of workpiece is again z=0. Uses "I" drill. 1600 rpm, 5 IPM.
3. Threaded Hole: #5 twist drill. 1600 rpm, 5 IPM.
4. Countersink by Interpolated Hole: 1/4" 2 flute HSS endmill. 1600 rpm, 20 IPM.
5. Rough Profile: 1/2" 4 flute corncob rougher. 1600 rpm, 50 IPM.
6. Finish Profile: 1/2" 4 flute HSS endmill. 1600 rpm, 50 IPM.
7. Engrave and Chamfer: 1/2" spot drill. 1600 rpm, 5 IPM.
When done, flip the part in the vise and re-run the facing operation until you've gotten rid of the "backing plate".
Left Bracket G-Code:
Making a Bracket
|
Do you want to be a better CNC'er in 37 Seconds? Get Better Tool Life, Surface Finish, and Material Removal Rates Fast. It's that easy. You can install and get results now.
|
||||||||||||||||||
| ||||||||||||||||||