|
Do you want to be a better CNC'er in 37 Seconds? Get Better Tool Life, Surface Finish, and Material Removal Rates Fast. It's that easy. You can install and get results now. |
Vise Tooling
This page includes various tooling projects to do with my Kurt (and clone) vises.
Better Vise Mounting Clamps
I had been using the normal clamps that came with my table clamping kit up until I got my new Glacern 6" Premium Vise. It came with a nice clamping kit that I like a lot better:
Old Style...
New Hotness...
The new clamps are simpler and more compact. For example, when I run two vises with my Jaws of Doom between them, it gets hard to swing a wrench in there. It also helps that I switched to a couple of Socket Head Cap Screws to use for these clamps.
I need to make up a couple of sets from some steel to use with my other vises. Incidentally, the Glacern vise has been superb!
Vise Jaws of "Doom"
I got started on this project after trying to do some engraving of a plate for a CNC enclosure. I was engraving 1/4" aluminum plate and the ends were just not being supported well enough by my 6" vise. Since I happened to have a second vise, I decided to make a set of Vise Jaws of "Doom" that could span both vises and provide ample support. A brief hunt on eBay yielded some very nice 4130 steel that I decided to make the jaws out of. I figure they'll be around for quite a while, so may as well do them up real nice.
To answer an obvious question, "How do they work in practice?" I was worried that the two vises would fight each other, but in fact, you can feel very close when they are in alignment and it's very easy to spin both handles at a close enough rate.
The finished Jaws of "Doom" are 24" long and span 2 6" vises to make one "Super-Vise"...
I squared up my block of 4130 right up front...
The face mill is a Glacern 45 degree 3" with inserts intended for steel. It cut very nicely!
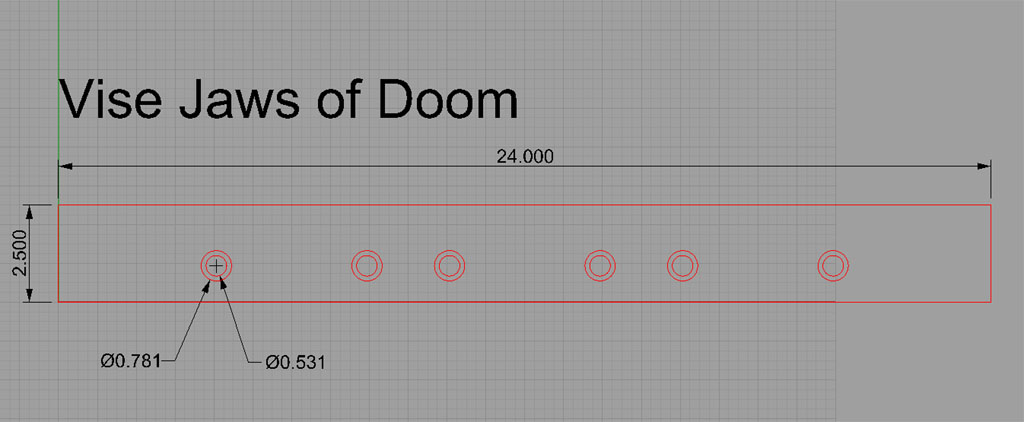
Here is the plan I drew in Rhino3D:

The mounting holes are 3.875" apart. I have 3 sets of holes so I can either stick the jaws across 2 vises with the end sets, or put them on one vise with the middle set...
BTW, the handy way to tram two of these vises is to tram one and then clamp my big Brown & Sharpe parallel in it. Clamp the other one on the parallel while lose and then clamp it down. Done!
G-Code to Countersink the Holes
G-Code for a Bigger Countersink
Fancy Kurt Vise Stop
Much more detail on this project on its own page.
|
Do you want to be a better CNC'er in 37 Seconds? Get Better Tool Life, Surface Finish, and Material Removal Rates Fast. It's that easy. You can install and get results now.
|
||||||||||||||||||
| ||||||||||||||||||