CNCCookbook Beginner's Guide to GD&T: Perpendicularity
GD&T Perpendicularity Symbol
Definition of Perpendicularity
In GD&T, Perpendicularity can refer to either Surface Perpendicularity or Axis Perpendicularity.
Surface Perpendicularity is a tolerance that controls Perpendicularity between two surfaces aligned at 90 degrees to each other. It is controlled by two parallel planes acting as a tolerane zone.
Axis Perpendicularity is a tolerance that controls how Perpendicular a specific axis needs to be to a datum. It is controlled by a cylindrical tolerance zone around a theoretically perfectly parallel axis.
If the Perpendicularity symbol is used for a hole or a pin, it is likely referring to the Axis Perpendicularity of the associated feature.
In both cases, perpendicularity is always relative to a datum.
Perpendicularity Callout on Drawings

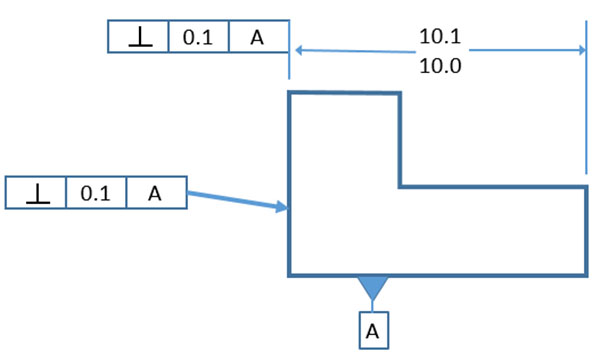
Surface Perpendicularity Callout...
The Surface Perpendicularity Callout above shows the two ways Surface Perpendicularity can be called out either as part of a dimension or directly associated with a feature. In both cases, we must also associate a datum "A".

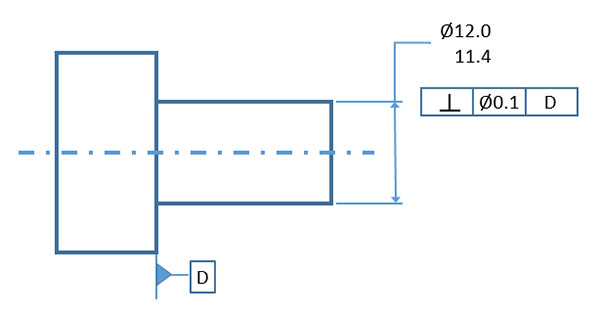
Axis Perpendicularity callout...
For the Axis Perpendicularity callout, we specify not just the perpendicularity, but the diameter of the tolerance zone's idealized cylinder. So, the axis of that cylinder is perpendicular to the datum "D", and the cylinder has a diameter of 0.1.
Perpendicularity Tolerance Zone
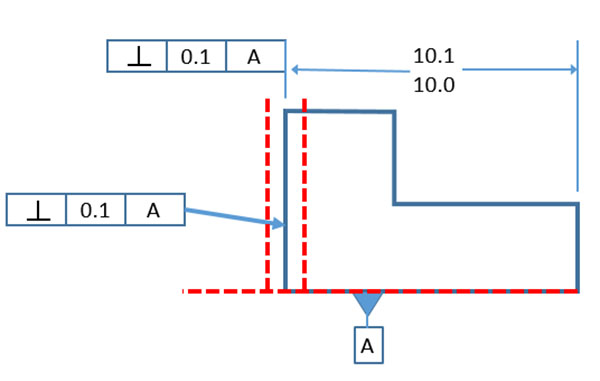
The Tolerance Zone for Surface Perpendicularity looks like two planes that are perpendicular to the datum and separated by the tolerance. Every point on the controlled surface must fall between the planes. Picture it like this with the dotted red lines being the two planes and the reference datum they're perpendicular to:

Tolerance Zone for Surface Perpendicularity is defined by two planes (dotted red) perpendicular to the datum (dotted red)...
The Tolerance Zone for Axis Perpendicularity is an ideal cylinder surrounding the axis. No part of the axis can protrude from the cylinder.
Gaging and Measurement of Perpendicularity
Refer to the Tolerance Zone diagrams above and you can tell pretty quickly how to sweep to measure Perpendicularity. For the Surface Perpendicularity example, sweep an indicator along an axis perpendicular to a surface plate that is serving as the datum, for example.
We can construct a functional gage for axis perpendicularity given that we basically just need a cylinder (or hole) gage of the dimensions of the tolerance zone's idealized cylinder.
|
Do you want to be a better CNC'er in 37 Seconds? Get Better Tool Life, Surface Finish, and Material Removal Rates Fast. It's that easy. You can install and get results in a matter of minutes.
|
||||||||||||||||||
| ||||||||||||||||||