CNCCookbook: Be a Better CNC'er

THREE WAYS TO SHARE

Beginner's Guide to
Using Conversational CNC
to Program CNC Parts

Deliverable: A G-Code Part Program created using Conversational CNC.

Conversational CNC is programming g-code by asking questions of the programmer in order to create operations that are similar to the operations a manual machinist might use. It does not require the use of a CAD model or drawing.

Conversational CNC is an option found built in to many CNC Controls. There is also Conversational CNC software available, such as the Conversational CNC module that's built into our G-Wizard Editor and G-Code Simulator.

Because it doesn't require you to create a CAD model first, Conversational CNC can be the fastest and easiest way to get a G-Code Part Program written for many simple parts. It can also be useful as a way to add features to parts, for rework and other purposes. For example, if a hole needs to be added to a part, it's trivial to create a Conversational CNC program that will drill the hole.

If you're a manual machinist, you already know the majority of what you need to know to use Conversational CNC, so it is an extremely easy way for you to get started programming CNC.


1

For each feature of the part to be machined, do the following:


1

Choose the Conversational CNC Operation to be performed

Deliverable: An operation is selected and the programmer can enter the parameters for the operation.

Operations are selected from a menu like this graphical menu of Conversational CNC Options from G-Wizard Editor:

Conversational CNC Menu for Milling Operations...


2

Enter the parameters in the Conversational CNC Wizard

Deliverable: The parameters required to generate g-code for an operation are entered into the Conversational Wizard.

Here are the parameters needed by the Surfacing (Face Milling) Wizard from G-Wizard Editor:
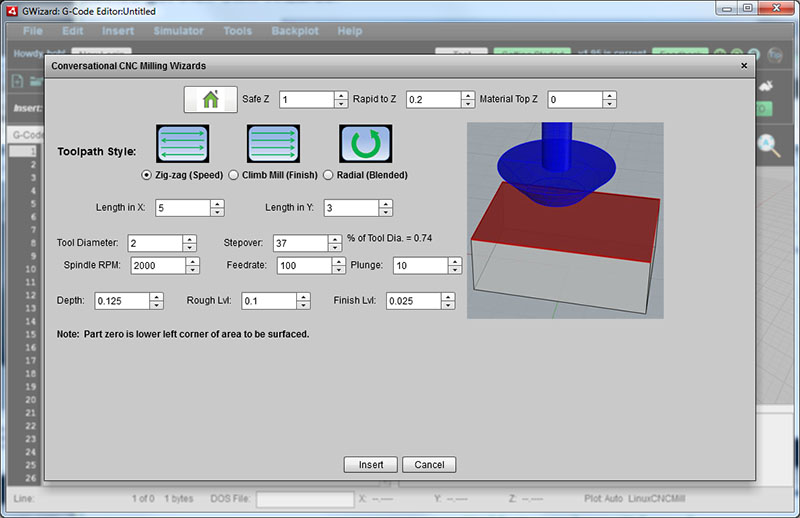
The parameters that must be specified are:

1. Toolpath Style. A graphical icon shows how the face mill will travel across the surface.

2. Safe Z: Z height where the cutter may move at full rapids speed in any direction without hitting anything.

3. Rapid to Z: Z height where the cutter may move at full rapids speed in Z only directly over the cut.

4. Material Top Z: Z height where the cutter will encounter the workpiece. Most CNC'ers like to use 0.

5. Length in X: Length of the area to be surfaced along X axis.

6. Length in Y: Length of the area to be surfaced along Y axis.

7. Tool Diameter: The diameter of the tool that wiill be used.

8. Stepvoer: % of Tool diameter to step over for each pass.

9. Spindle RPM & Feedrate: The Feeds and Speeds to use.

10. Plunge: Feedrate to use for the final plunge down onto the workpiece to start cutting.

11. Rough Lvl: The depth of cut when roughing.

12. Finish Lvl: The depth of cut for the finish pass. The total depth of cut will be Rough Lvl + Finish Lvl

These are all pretty simple questions that are easily answered, even by beginners. To figure out the Feeds and Speeds, use a tool like G-Wizard Feeds and Speeds Calculator.


4

As each feature is programmed, their G-Code is added together to make a complete Part Program

Deliverable: A finished G-Code Part Program is pieced together feature-by-feature as each Conversational Wizard is completed.

There's no requirement to do the whole part in one go. Sometimes it's easier to do one feature, cut it, and then do the next feature. So each feature becomes a separate small part program.

When used this way it is most convenient to have access to Conversational CNC right on the Shop Floor near the machine, either because it is built into the CNC Control of the machine, or because its on a laptop or other PC located near the machine.


Back to How to Make CNC Parts

 
All material © 2010-2016, CNCCookbook, Inc.