|
|
|
|
|
|
|
Do you want to be a better CNC'er in 37 Seconds? Get Better Tool Life, Surface Finish, and Material Removal Rates Fast. It's that easy. You can install and get results now. |
 |
Twist Drill Feeds and Speeds CNC Feeds and Speeds Cookbook |
Introduction to Twist Drills and Chip Formation
The lowly twist drill is one of the most commonly used tools in the machinist's arsenal. By all accounts, it also has some of the highest material removal rates of any of the tooling available. As such, it's worth getting to know them a little better.

The number one factor affecting twist drills is chip formation and evacuation. The deeper the hole, the more likely chips can jam. The ideal chips are short curled chips because they evacuate the most easily. Listen to your twist drill for a steady sound. If the sound starts and stops, you're getting some chip jamming. Also, take a look at whether nice curled chips are coming out or there are bent chips. The latter is an indication of jamming.
Entry Conditions
Depending on the condition of the surface, feedrate should be varied to accomodate the surface. Examples:
- Irregular or Rough Surface: Cut the feed back to as low as 1/4 the normal feedrate to avoid chipping the twist drill.
- Convex: Convex surfaces are hard to do unless the radius of the convex surface is greater than 4 times the drill diameter and you're entering perpendicular to the convex radius. If this is not the case, mill a flat spot for the drill to get started on before attempting to drill.
- Concave: Don't attempt a concave surface unless the radius is more than 15x the drill diameter and the drill is centered on the concavity and not the wall. You can drill the wall of a concave surface. Reduce feed to 1/3 when entering. If the surface doesn't meet these requirements, mill a flat before attempting to drill.
- Angled: Treat entry and exit of angled surfaces the same. If entering or exiting an angle surface of 2 to 5 degrees angle to the tip or less, reduce feed to 1/3 of normal to accomdate this interrupted cutting condition. For surfaces angled 5 - 10 degrees, ideally use a drill whose point angle matches the angle of the surface. If the angle is more than 10 degrees, you'll need to mill a flat before drilling.
Keep 'Em Sharp!
One of the easiest ways to improve twist drill performance is to make sure they stay sharp. You'll be using the heck out of your Twist Drills and nothing is more annoying than a dull bit. There's a lot of life left in the twist drill if you can sharpen them. Drill bit sharpeners are available at every price range or you can sharpen by hand at the grinder. I use a Drill Doctor which is cheap and cheerful, has all the right adjustments, and makes it super easy to have sharp twist drills on hand at all times.
Use the Right Point Angles and Point Types
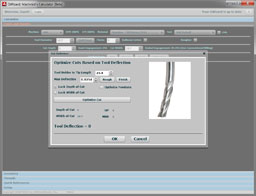
Different materials benefit from being sharpened with different point angles. Being able to deal with the different angles is one reason to have a sharpening machine on hand, or to have good facility with hand sharpening the drills. You can look up the best point angle in references like the Machinery's Handbook, or you can use our G-Wizard Calculator to tell you the right point angle for any given material you've chosen:
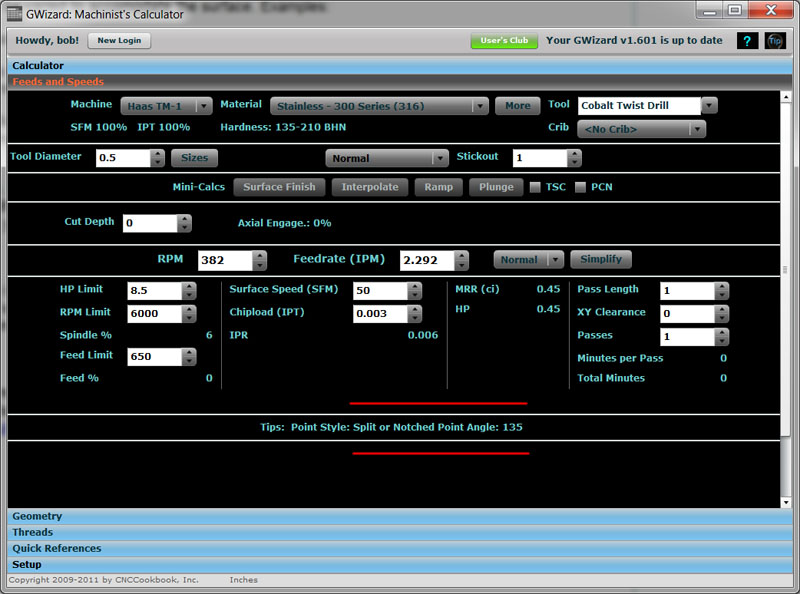
G-Wizard recommends either a split or notched point with a 135 degree angle for 300 series stainless steel...
In addition to the angle, the point type is also useful in maximizing twist drill performance.
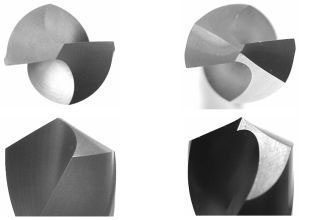
Regular point on the left, split point on the right...
The more exotic points require a little more effort, but they are an aid in self-centering the bit, they reduce cutting forces, and they break chips better.
Pre-Drilling, Pilot Holes, or Step Drilling Holes
There's a lot of controversy around this practice. Should you pre-drill a pilot hole or not? What about step drilling?
The value of the pilot hole is to reduce drilling forces around the center of the hole and hopefully, to more accurately position the drill. The effectiveness of a pilot hole is dependant on the size of the pilot relative to the larger twist drill that will follow. In general, pilots are discouraged for holes smaller than 1" (25-30mm). If you're drilling such a smaller hole, just go for it without a pilot. That's not to say you might not benefit from spot drilling (see below), but that's different than a full depth pilot hole.
Why discourage pilots? Because chip breaking doesn't proceed correctly if the pilot hole is too large relative to the overall hole and because it's faster to go without the pilot for holes smaller than 1" or so. If you're seeing the issue with chip breaking, you can readily understand that step drilling, where you make multiple passes in the hole with increasingly large bits is also discouraged.
There is a case where a pilot hole can be helpful for all hole sizes. When you're drilling more than 7 x Drill Diameter in depth it can be helpful to do a small pilot hole to a depth of 2 x Drill Diameter. G-Wizard will automatically offer this tip when appropriate.
When drilling a pilot hole, make the diameter a little larger than the web thickness of the big twist drill you're clearing the way for.
Spot Drilling and Other Techniques to Accurately Position Twist Drill Holes
Use Screw Machine-Length Twist Drills
The simplest way to improve the accuracy of your drilling is to use screw machine-length twist drills instead of jobber length. The shorter bits will flex less and are therefore more accurate. The full length of a jobber-length twist drill is seldom used anyway when metalworking as the jobs gets more challenging in a hurry the deeper the hole.
Spot Drill the Hole
If you use a carbide drill or a screw machine length drill, spotting is typically not needed. As a matter of fact, most manufacturers will recommend against spot drilling a carbide drill or an insertable drill because the spot drilled hole is more susceptible to chipping the carbide. You can save a lot of time by avoiding spot drilling.
If you must, use a spot drill to locate the hole. While many manual machinists use center drills for this purpose, a true spot drill with no small diameter pilot is a better bet. The center drill is a specialized tool for producing holes for lathe centers. It's small diameter pilot is delicate and center drills are unnecessarily more expensive than spot drills.
You want to use a spot drill whose angle is the same as or greater than the twist drill's point angle. The reason is that you want the twist drill to make contact with the spot drill's hole at the tip, not the edges, for best centering.
You should consider avoiding a spot drill when using a solid carbide drill or when drilling materials that work harden easily.
For more, we have a special Spot Drilling page too.
Tip: Annular Cutters or Interpolation for Large Through Holes
Cutting forces go up in a hurry with larger hole sizes. Not much will tax the machine's horsepower limits more than loading up a great big twist drill, or worse a big spade drill to make a large hole. Cranking a 2" indexable drill through 300-series stainless steel takes 8HP, for example.
There are two good alternatives, depending on whether you need a through hole or a blind hole. For through holes, the best bet may be an annular cutter:
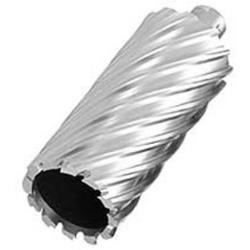
The annular cutter removes a slug by creating a ring-shaped hole and leaving the center intact...
Because they don't have to turn the whole hole into chips, just the circumference, annular cutters can move a lot faster and with a lot less power than an equivalent sized twist drill. Unfortunately, if they don't go all the way through, there's no way to extract the slug that's left, so they're only good for through holes.
The alternative for blind holes (which also works on through holes, just not as fast) is to use an endmill and interpolate the hole.
Techniques for Deeper Holes
What is a Deep Hole?
A deep hole is any hole that is more than 5 diameters deep. The deeper the hole, the more difficult chip extracton becomes. Because of this, you should be reducing your feeds and speeds the deeper the hole gets.
Peck Drilling
Peck drilling cycles are common on most CNC machines. With peck drilling, the twist drill is retracted periodically some distance to facilitate chip breaking and clearing. There are a lot of different kinds of peck cycles, and the deeper you're drilling the more frequently you should peck and the further the retraction. The most important thing to keep in mind for peck drilling is the need to avoid trapping chips at the bottom of the hole. If there are chips left at the bottom, they interfere with the ability of the twist drill to re-establish its "bite", which can result in premature dulling of the drill and poor surface finish.
When pecking, consider pausing the retraction after a very slight retract--say 0.001". Left the twist drill spin for a couple of revolutions to pull the chips out of the deepest part of the hole. Also, never retract the tip clear of the hole if you're going back into the hole. Doing so makes it easier for coolant to push chips back into the hole.
G-Wizard Calculator will automatically recommend when peck drilling should be used.
Parabolic Flutes for Deeper Holes
When drilling deeper than 7 x Diameter, twist drills with parabolic flutes are helpful with chip extraction. You can go a lot deeper with a parabolic flute drill--20 x Diameter vs only 7 x Diameter.
G-Wizard Calculator will automatically recommend using a parabolic flute drill when it would be helpful. For more, see our article on parabolic drills.
Through Spindle Coolant
Through spindle coolant delivers coolant at pressure through holes drilled along the length of the bit. This helps blast the chips up and out of the hole from the bottom, and really facilitates deep hole drilling.
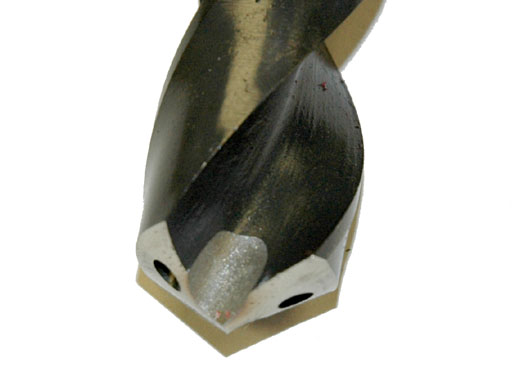
Through spindle coolant holes in a twist drill. Note the extra grind to reduce web thickness with a split point...
Next Article: Feeds and Speeds for V-Bits, Dovetails, and Other Cutters
Try the Free Trial Version of G-Wizard Speeds and Feeds Calculator...
![]()
No credit card required--just your name and email.
CNC Milling Feeds and SpeedsContents


|
Do you want to be a better CNC'er in 37 Seconds? Get Better Tool Life, Surface Finish, and Material Removal Rates Fast. It's that easy. You can install and get results now.

|
||||||||||||||||||
| ||||||||||||||||||