|
|
|
|
|
|
|
Do you want to be a better CNC'er in 37 Seconds? Get Better Tool Life, Surface Finish, and Material Removal Rates Fast. It's that easy. You can install and get results now. |
 |
Fitting a QCTP to the Lathemaster 9x30 Lathe |
| Part 1: Design and Planning (aka "Dark Mutterings") |
Quick Change Toolposts are a beautiful thing. My Lathemaster 9x30 came with a turret-style toolpost. Not bad, but it requires shimming to bring the lathe tool up to the centerline of the workpiece (where you always want it to be), which makes changing tools a hassle. The answer to this dilemma is called a Quick Change Toolpost, or "QCTP". Think of the QCTP as equipping your lathe like a gun that takes clips (we call them "toolholders") rather than a gun where each shot must be loaded individually by hand with a lot of fussing.

On the left, turret style. On the right, Phase II QCTP.
You can see the comparison of the two styles in the photo above. Take a look at the toolholder for the QCTP. Note the thumbscrew with jam nut to adjust the height of the tool tip. On the lefthand turret post, you can see my Glanze carbide insert tool is resting on a shim to raise it up. You can fit 4 tools into the turret style and rotate them into place, but it still isn't as convenient as dropping a new toolholder that has already been adjusted onto the dovetail of the QCTP, tightening the handle, and being ready to go immediately.
A number of companies make QCTP's, with Aloris being the most famous and the most expensive. I got a Phase II on sale from Enco, and it is a fine sturdy piece. These things are not bolt-ons. You will have to modify your lathe in some way in order to attach one, but the modifications are tried and true. In other words, many have gone before you and documented their methods on the web. Also, be sure of what size QCTP is best for your lathe. There are a number of standard sizes (so the toolholders will interchange). Mine is an "AXA" size. You can also make a QCTP from scratch, which is an intriguing project. Unfortunately, you really need a mill, and as I discuss below, I do not yet have one. This will cause pain even with my storebought QCTP as we shall see.
The issue you will face is adapting the toolpost stud to fit the QCTP you select. This picture makes clear the problem:
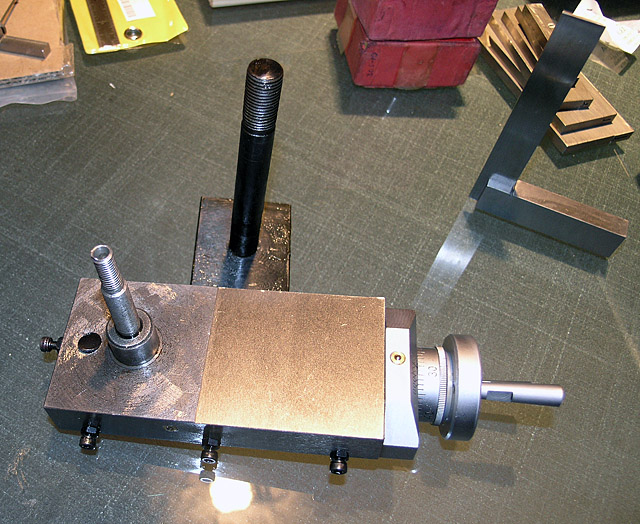
Oy that's a big stud next to the little tiny stud that comes with...
You can see that once you finish, the end result is not only more convenient (center once in the toolholder and forget it), but also likely more rigid. You can never have enough rigidity in your studs! Sorry, couldn't resist...
Now there are two distinct strategies available for dealing with this problem. Many authors have created a sleeve that is threaded on the inside and the outside. The sleeve screws down over the original stud and has an outside diameter and threads that match the new larger stud. This technique has been used many times, and the sleeves are pretty easy to make on your lathe. The best news about this technique is that it is completely reversible if you ever want to put the lathe back the way it was. The bad news is that (it seems to me, though some very fine hobby machinists have taken this route and been happy) a sleeve will be weaker and less rigid than the full on stud. In addition, sleeving won't work for me. Note the little boss/shoulder that sits at the bottom of the original stud in the photo above. It has a 20mm outside diameter--too large to fit the 14mm hole in my QCTP! If I want to go with a sleeve, I will also have to contemplate boring the lower part of the QCTP hold to accept this boss. Frankly, that idea bothers me a bit, though perhaps it shouldn't. Let's leave it for the moment.
The second strategy would be to remove the little stud, bore out the hole, and tap if for the larger stud. I have to say, this seems like the way it ought to be done at first blush. Now for the bad news here. It's that doggone boss again. I shall have to mill it off before I can fit the stud, otherwise I'm right back to boring out the QCTP which I've already said I do not want to do. The trouble is, I've got no milling machine! So now I have to travel to the local machinist, slide in hand as it were, and beg him to mill my boss for me so I can have a larger stud. Oh the shame of it! But at least we can have a QCTP and hopefully move forward.
Actually, it was pointed out to me on the 9x20 Yahoo Group that you can turn the slide on the lathe in lieu of a mill, but to do so you will need a plinth toolpost since you'll be machining your slide. This seemed like rather an excessive amount of additional work, so I discarded the suggestion almost immediately (bad attitude I suppose). Another thought someone had was that they had drilled out their QCTP with no problems (yay!), but that they had purchased a finished slide from Lathemaster only to discover there are very few threads for the stud without the boss. Hmmm, the plot thickens.
I will add that I suspect the troublesome boss is a "feature". The Lathemaster is a sturdier lathe for its size than most, and I'm sure the designers in China felt they were adding real value by making this thing stronger using this boss. You can also buy your QCTP from Lathemaster along with a carriage that's machined so you just bolt it all onto your machine (I suspect it only works for Lathemaster's lathes though). That would be cheating even more than taking your slide to the local machinist for milling, so I have steered clear of it. You may not be so pious in your endeavors.
Okay, now that I've finished that little circular diatribe, let's go back and look again at the QCTP. There does appear to be enough meat there that I can probably bore out the bottom to accomodate the 20mm boss and the one helpful fellow did live to tell of his experience with it. If I do that, I avoid the outside milling job and I then have to decide whether to go with a sleeve or knock out the old stud and thread in a new. I'm going with a sleeve design for a couple of reasons. First, it preserves my option to undo everything and go back to the old lathe. As a beginner expecting to screw up, this remains important to me. Second, the fellow's comment about how few threads there would be to secure the bigger stud has hit home. While I would have more by threading the boss, I still like this sleeve idea better.
I shall have to disassemble the QCTP to make darned sure of clearances, as well as to make it easy to clamp in my 4-jaw chuck for boring. The exploded diagram that came with the QCTP sure makes it look like I can bore for the boss with impunity. Meanwhile, let's make a crude drawing of what we're building here:
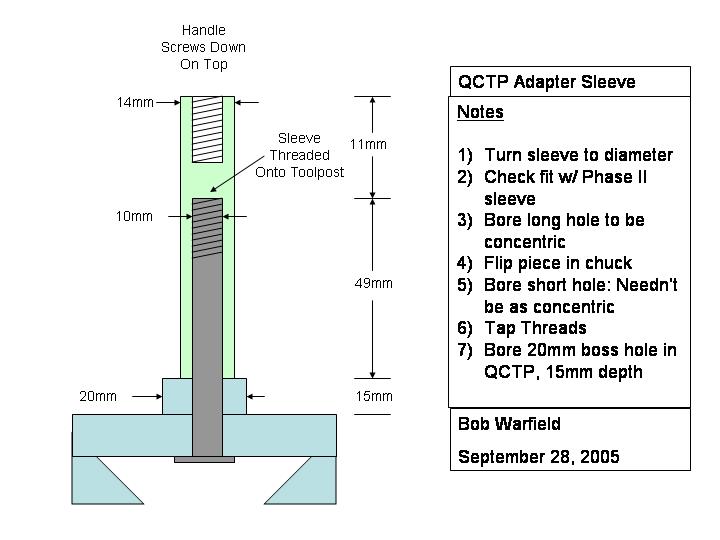
I have more or less laid out my plan of attack in the notes for the drawing. The key issue is that the long hole in the sleeve be concentric with the outer diameter, so we need to establish both in one setup. No problemo! The short hole it really doesn't matter if it is highly concentric. We're just going to thread the handle into the top to lock down the QCTP, so we have a margin of error.
For the boring operations I intend to use brand new drill bits chucked up in the tailstock and for threading I shall use a tap, probably also chucked in the tailstock. I'm not going to try to learn to cut threads on the lathe on this, my first project! Nor am I going to try to bore any long skinny holes with a boring bar, even if I had a boring bar, which I don't. Yet. So, on both operations, I'm gonna take it easy, go slow, back off to clear chips a lot, use my Tap Magic cutting oil, and take great care.
For the handle on top, I'm going to get a bit of threaded rod (aka cut the head off a bolt) and loctite it into the original handle seen in the picture at top. There is a sleeve that goes between the mounting stud and the QCTP so that the tightening nut on top doesn't jam the rotating QCTP mechanism. I've checked, and the diameter of the Lathemaster handle is just right in terms of just bearing on the sleeve and not on the rotating QCTP mechanism. More importantly, it's color matches that of the QCTP mechanism really well, so we will be very fashion coordinated. These things are important!
As I write this, I have turned one single thing in my entire life three days ago when I first set up the lathe. It's like the Blues Brothers. We're in a cop car with a broken cigarette lighter, no money, and wearing sunglasses. At night. We can do this!
Now here is a beautiful thing--got to be good Karma from this--I am going to machine this sleeve out of that same piece of steel rod that is the only thing I've turned in my entire life. If I get it right, that little piece of metal is going to be with me doing good work for a long time. It's only chance that my glee at making chips had me stop short before I got to the 14mm OD I need for this sleeve.
|
Do you want to be a better CNC'er in 37 Seconds? Get Better Tool Life, Surface Finish, and Material Removal Rates Fast. It's that easy. You can install and get results now.

|
||||||||||||||||||
| ||||||||||||||||||