|
Do you want to be a better CNC'er in 37 Seconds? Get Better Tool Life, Surface Finish, and Material Removal Rates Fast. It's that easy. You can install and get results now. |
Home Switches for the IH CNC Mill
Why Home Switches?
Suppose you have no home switches. Every time you shut off the mill it loses track of its position. I used to go through this drill. If a servo faults, if I hit the E-Stop, or if I just wanted to shut down for the night, I would have to come back and find a way to precisely realign the machine with where it should be. This typically meant getting out the edge finder and trying to locate some feature of the part I was making. Ugh! What a lot of time was wasted.
When you have home switches, you simple press the "Ref" button to reference an axis, or "Ref All" to reference all axes. When you do this, Mach knows to move the mill axis in the positive direction until exact instant the home switch closes and then back off slightly until it opens again. At that point, it knows that is the machine's 0 on that axis. At least it knows that is the spot to the accuracy of whatever kind of switch is being used. In this case, these IH optical switches are known to be good to a couple of tenths, which is pretty darned good!
Industrial Hobbies Optical Home + Limit Switches
I've had a set of optical limits from IH for quite a while. These are well-made switches based on the Fairchild H22LTB optical interrupter switches. Each switch is in a milled aluminum box and contains two of the optical switches:
X-axis.
There is a paddle that breaks the beam on the two optical switches. It's springloaded. As the table moves left or right, a button in the T-slot on the front of the table engages the pins on either side:
The Z-axis uses a long rod in place of the pins:
The rod is captured by a block mounted on the mill head. Colors (in red) mark the travel limits. The block engages the collars to pull the paddle inside the limit:
The Y-Axis works the same as the Z:
It's time to get them connected!
Home Switch Wiring
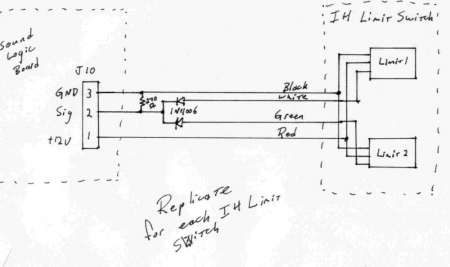
Each IH switch contains 2 optical switches and can sense a limit in either direction. I wanted to gang the two switches together on each axis so they would fire in either direction and only use 3 inputs from my Smoothstepper, one for each axis. I spent an hour and a half tracking this down on CNCZone. Here is how the IH optical limits are supposed to be wired to a breakout board:

This schematic calls for a 270 ohm resistor, but another fella on the thread found a 330 worked better.
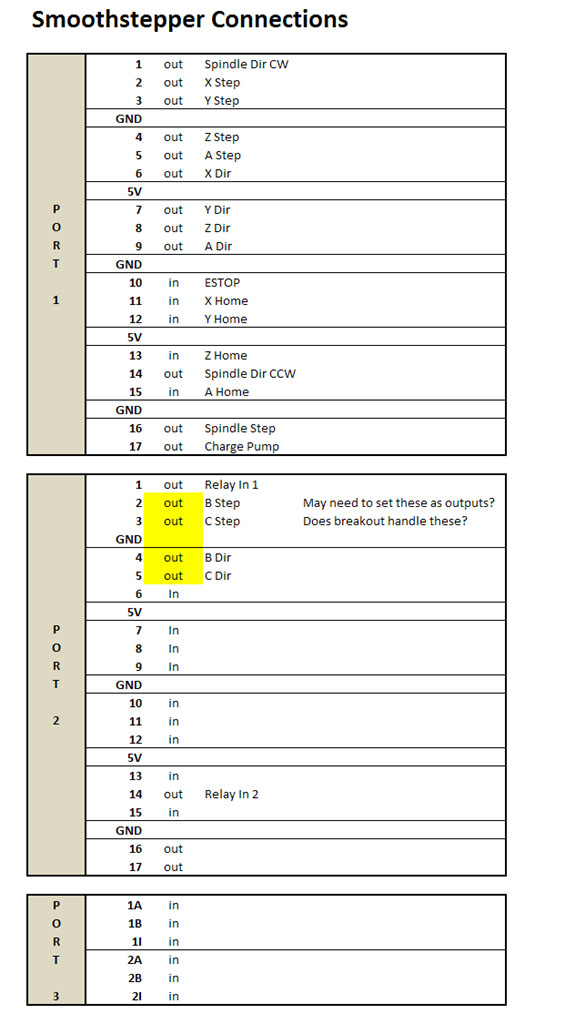
I will connect my home switches to Port 1, pins 11, 12, and 13 (X, Y, and Z, respectively):

Here is a little prototype board to house the diodes and resistors:
Connectors are wired to the board with the same shielded cable used to go to the home switches. From there, we have a connection to +5VDC, ground, and 3 signals out, 1 for each axis...
CNC Enclosure Rear Panel Layout and CAD Work
Since I have a working CNC now, I wanted to make a nice rear panel for the Home Switch connections. While I was at it, I decided to make the panel ready for future connections including my probe and coolant. In addition, I put a connector for the power cord, which currently snakes its way crudely through a rough hewn hole in the panel.
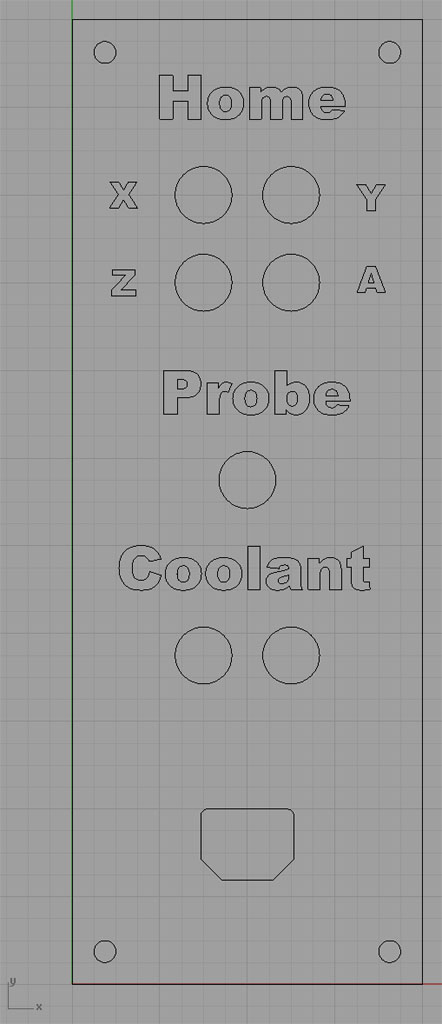
Here is the Rhino3D rendering I did of the 11" x 4" panel:

The circular cutouts are for microphone connectors I purchase from Action Electronics.
To CNC this panel requires the following operations:
1. Cut the panel free of a larger 12 x 12" plate by milling 2 of the 4 edges.
2. Engrave the text. To engrave I plan to use a simple spot drill with very shallow depth of cut. Since I will have the spot drill loaded in the mill, I will also spot the 4 corner mounting holes. I'll run the spot drill at 1600 rpm with a feedrate of 7 IPM, and I will cut to a depth of 0.040. According to G-Wizard's chamfer calculator, that will give me an engraving width of 0.080. Note that by engraving everything, I also leave a nice little chamfer for all the edges.
3. Drill 4 x 1/4" corner mounting holes with a twist drill. This calls for 1600 rpm with a feed of 9 IPM. Should be no need to peck, or at least so says G-Wizard!
4. Interpolate 7 x round holes for microphone connectors and the odd shaped hole for the power plug. Given the radii on the connector's shape, I plan to use a 1/8" endmill to do the finish pass. At my mill's maximum spindle speed of 1600 rpm, we need to take it real slow and easy on this little endmill, so I will feed at 1.6 IPM only, which will make things very slow, but it will be less likely I break the endmill and I will cut full depth of hole. To do the roughing, I plan to use a 3/8" 3 flute endmill, run at 1600 rpm and 19 IPM, with each pass taking 0.040" depth of cut.
5. Surface the back side. This is 1/4" 6061 plate, and some of the connectors won't reach all the way through. So I plan to take off 80 thousandths with a face mill. I will do this with my Glacern 45 degree 3" facemill, at 1600 rpm and a feedrate of 38 IPM. I'll make two passes of 40 thousandths each.
All feeds and speeds are courtesy of G-Wizard. I like to figure them ahead of time and have them handy since G-Wizard gives better numbers than my OneCNC CAM program.
Making Chips via G-Code
I did the panel cutout just by hand typing g-codes into Mach3's MDI interface.
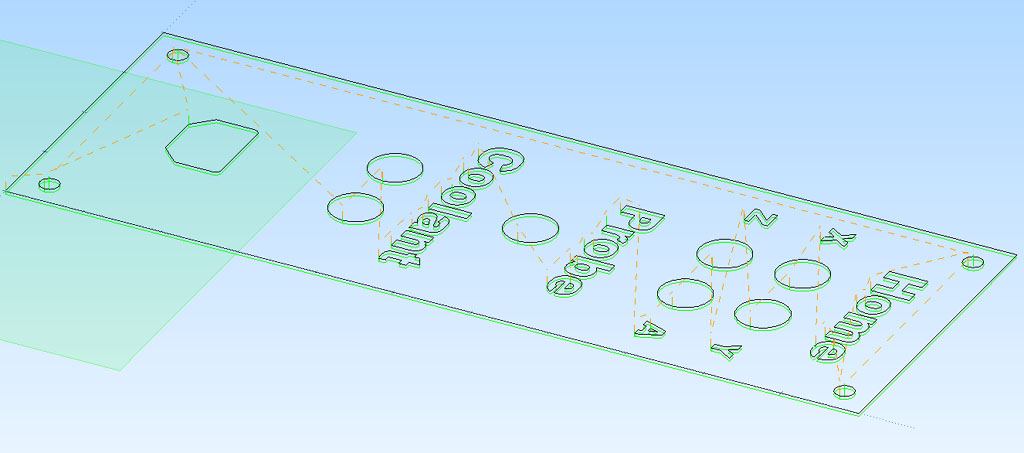
Here is a screenshot from OneCNC of an engraving and spot drilling toolpath:

Interpolate the 5/8" holes with a 1/4" endmill
Pocket the AC socket with a 1/8" endmill
Here is the engraved board just before installation, during the test of the switches...
Mach 3 Setup
I'm using what the Mach 3 documentation calls "option 2", since the limit in both directions as well as the home for each axis is controlled by a single signal. So, I want to set all 3 signals to be the same pin of the port for each axis. This is easy to set up on the pin configuration dialog under inputs. Just set the "--", "++", and "Home" entries to be the same signal for each axis. The diode board ensures that whichever way the axis travels it will close the switch and light up the signal. Mach knows whether to treat it as a limit or home based on the context. It assumes it is a limit in whatever direction it was moving at the time unless it is in the process of referencing the axis.
|
Do you want to be a better CNC'er in 37 Seconds? Get Better Tool Life, Surface Finish, and Material Removal Rates Fast. It's that easy. You can install and get results now.
|
||||||||||||||||||
| ||||||||||||||||||