GW Editor User Guide
|
||||||||
|
G-Wizard
Editor: Revisions
Introduction to Revisions Revisions are commands that scan through the g-code and make revisions. Think of a Revision as a sort of automated editor that makes a particular change to your g-code. Examples of Revisions include:
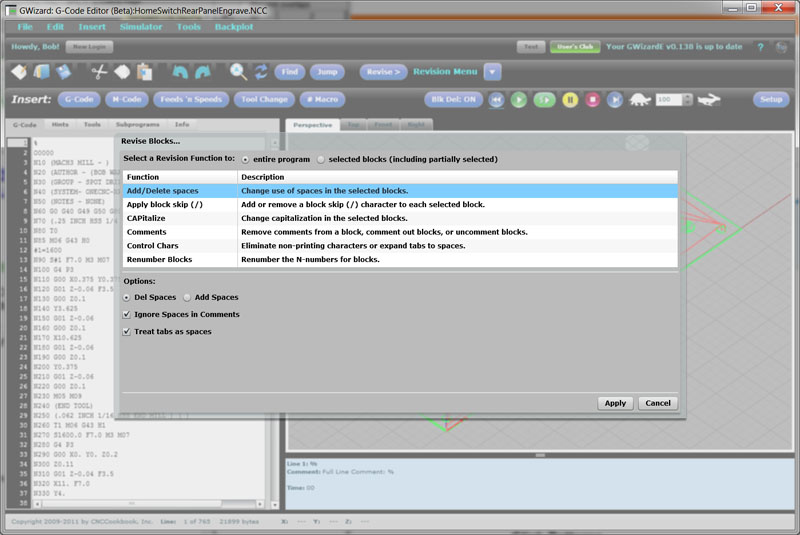
There's a long list of Revisions that will eventually be added to GWE. "What's so special about Revisions?" you ask. After all, a number of g-code editors have these capabilities. It's true, if Revisions were simply going to be commands you could trigger manually, they wouldn't be that unique. Perhaps a little cleaner UI as they're all organized together into the same format. Here for example is the Revision Chooser:
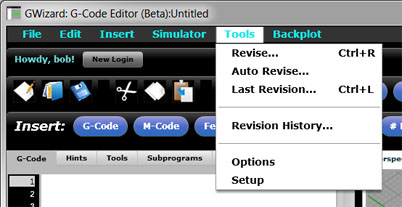
The list of Revisions... As I say, if that's all there is, it's helpful, but not revolutionary. But, there are big plans for Revisions. Referring to the screen shot, as you step the cursor through each Revision, its options appear below the list. Getting all Revisions to look the same and work through the same interface instead of being separate commands is the first step in realizing their potential. The goal is to make it possible to use the Revisions as automatic building blocks for transforming your g-code to follow the Best Practices you want for your shop. Let's say there's a set of commands you have to perform on every g-code file to make it suitable for use. Perhaps you have an older machine that doesn't have much memory, so you want to squeeze out all the spaces from the program. Another machine wants "G00" not "G0", but you're used to typing "G0" and just can't kick the habit. With multiple machines and controllers, there may be subtle differences in the g-code one expects versus the other. In extreme, perhaps you have a newer lathe that has canned cycles like G71 and an older lathe that lacks G71. You like to program with G71. What if you had a Revision that could simulate the G71 and generate the G-Code to perform the same rough turning without G71? That's the promise of Revisions. We think they'll be quite a revolution in the g-code world. Some of you are probably wondering why you'd want to look at the g-code at all--you're used to your CAM program and the machine control and don't want anything to come between them. There will be Revisions you may find useful too, as well as other reasons why a G-Code Simulator and Editor might be useful to you. Think of GWE as your Shop Floor Swiss Army Knife for fiddling with g-code in various ways. You don't have to program g-code from scratch to get some use from it. Over time we'll give you all sorts of ideas how. Revisions are selected via the Tools Menu:
The Tools Menu has 4 Revisions-related commands: - Revise: Where Revisions can be accessed. - Auto Revise: Where you set up automatic Revisions that can be triggered on file load, file save, or every time the file is parsed. - Last Revision: Executes the last Revision you ran with the same options set. - Revision History List: A list of recent Revisions in case you want to run one again. You can also access Revisions from the Tool Bar:
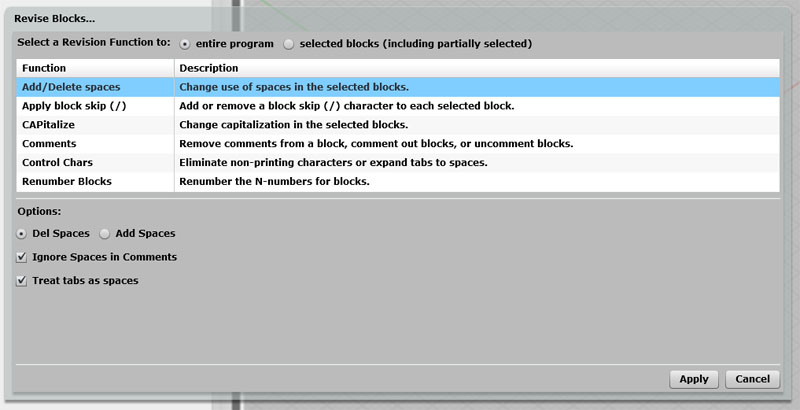
Run the last Revision again with the same options by clicking the "Revise" button. The message to the right tells you which Revision you're getting. If you haven't run any yet, it just brings up the Revision Tool. The down arrow also brings up the Revision Tool so you can change an option or pick a different Revision. Here is the Revision Tool:
The Revision Tool lets you select different Revision Functions, see what they do in the Description column, and see their various options down below. When you find the Revision you'd like to make, select the appropriate options and press "Apply". Or, press "Cancel" to back out without making any revisions. Below is a list of the available Revisions with a description of their purpose and options: Add/Delete Spaces Purpose: Like the name says, "Add/Delete Spaces" is used to add or remove spaces. Why would you want to remove spaces? Largely to reduce program size for machines with limited controller memory. Why add them back? To make your programs easier to read. If you have to do a lot of work with a machine that needs to remove spaces, consider creating a File Open Auto-Revision to add spaces and a File Save Auto-Revision to remove the spaces. That way, whenever you have to edit a file, it will have spaces, and whenever you save to send it to your machine, it will create a smaller file. Options:
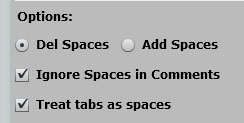
You have a choice to Del(ete) or Add Spaces. Spaces are added between each the argument for each word (letter), but not between the word and the argument. For example:
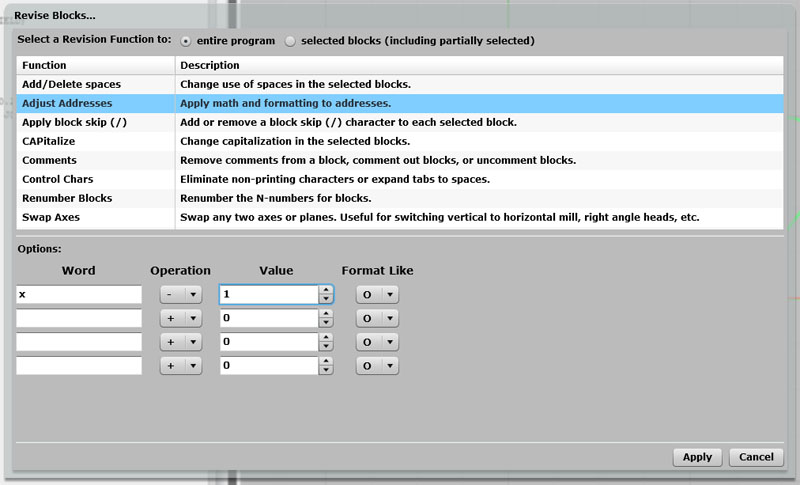
You have the option to ignore spaces in Comments. This keeps the comments looking more like conversational language. You have the option to treat tabs as spaces, which means tabs will be deleted when you run Del(ete) Spaces. Adjust Addresses The Adjust Addresses command makes it easy to apply math and formatting to addresses:
Adjust Addresses revision makes it easy to apply math and formatting to addresses... It lets you modify the value of up to 4 different words. Enter the word, the operation, a value, and which word you want to format like. The example in the screen shot will subtract 1 from every "X" word and format the result as you would an "O" word. Apply Block Skip (/) Purpose: Apply Block Skip makes it easy to add or strip block skip characters. Options: The options are simple. Choose "Skip" to add Block Skips to every line that is selected and "Unskip" to remove any Block Skips found in the selected range of lines. Arc Adjust Purpose: Change arc usage in a program. For example, change all IJK-style arcs to be R-style. Options: - Change IJK to R - Change R to IJK - Convert IJK centers to absolute centers - Convert IJK centers to relative centers CAPitalize Purpose: CAPitalize makes it easy to set the capitalization on your g-codes. Some prefer consistent capitalization for readablity and some controls may require it. This is another good one to consider setting up an Auto-Revision for. For example, you could set one on File Load, Parse, and Save and that will pretty much guarantee that no matter how you've typed, copied and pasted, or otherwise created g-codes, they will be properly capitalized. Options: Just one option, the ability to ignore comments and leave their capitalization alone. Comments Purpose: Comments provides the ability to comment out the selected block, un-comment it, or to delete all comments within the selected block. Commenting out code is a good way to execute just the code you leave uncommented. Perhaps you want to temporarily modify a g-code program to skip some steps, or maybe you want to save time debugging by not executing the commente out code. When you're ready to uncomment the code, the Comments Revision makes that easy too. When G-Wizard comments out code, it leaves the block (N) number intact and outside the comment. The Comments Revision also has the capability to strip comments out of your g-code. Like deleting spaces, this is something you might choose to do in order to save on the memory required to run the g-code program. Options: The options are simply whether you want to Comment out, Uncomment, or Delete comments. Control Characters Purpose: Sometimes your g-code program files will pick up non-printing characters. Various software leaves such characters behind. Aside from being a nuisance to look at in the editor, these characters can also trip up some CNC controllers, so it's usually a good idea to delete them. That's exactly what the Control Characters Revision does. Options:
The Control Character Revision will delete any non-printing characters, and in addition has the option to convert tabs to spaces. You can specify how many spaces. If you uncheck "Convert tabs" then tabs will be left alone in the file unmolested. Delete Words Purpose: Selective deletion of words that have certain address values. Options: You may select up to 4 different words to process and optionally delete them if their address equals a certain value. Monitor Words Purpose: Adds a string after a particular word. Options: A string may be added everywhere the word is used, or just when the address for the word equals a certain value. Relative/Absolute Purpose: Change XYZ coordinates to be either relative or absolute. Options: Select whether coordinates are to be realtive or absolute. Renumber Blocks Purpose: Sequence numbers ("N" numbers) are a nuisance to keep straight in a g-code program. The Renumber Blocks Revision is useful tool for automatically renumbering blocks. It has a lot of smarts for exactly what to renumber and how. Renumber Blocks understands how to adjust number references. For example, when you use a G71 rough turning canned cycle it has P and Q words that refer to the first and last block number defining the profile. If we renumber, we have to adjust the P and Q words to whatever their original block numbers got changed to. Options:
Starting Number: This is the first Block Number that will be used. Interval: The amount to increase consecutive Block Numbers. Choices are 1, 2, 5, 10, 20, 100, and 1000. Skip Blocks Starting With: Don't renumber blocks whose first printing character is one of these characters. Block Number Character: Block Numbers are this word (character) followed by the number. Limit Block Numbers To: If this option is turned on, only lines that fit one of the checked options below will be numbered. Numbers are removed from lines that don't fit. Options for which blocks to number:
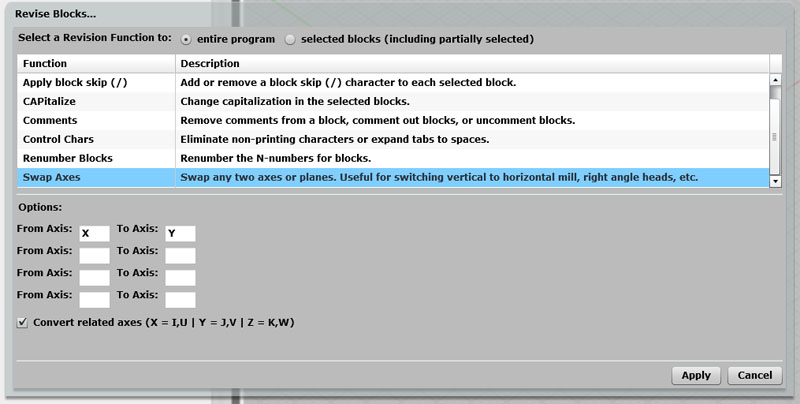
Max Value: The largest Block Number supported by your controller. This number will be initialized from your post but can be overridden if you prefer. Restart: After the largest block number has been used, numbering starts over again with this value. Swap Axes (For Right Angle Heads, Horizontal Mills, and Such) I ran across a request over on CNCZone for the ability to go through a g-code program and swap the axes. Apparently this is useful for writing programs for right angle heads or in some cases for converting a program from a vertical to a horizontal mill. I did a little research and came across two threads over on Practical Machinist that wanted the capability for the same reason. Since it's not hard to do and seemed to be something useful, I put together the capability to do this in G-Wizard G-Code Editor. It looks like this:
The Swap Axes Revision will swap up to 4 axes and automatically convert the related axes... With Swap Axes (under the Tools Revisions menu), you can swap up to 4 axes if you need to. Just tell it the "from" letter and the "to" letter. These is also the option to automatically swap any related axes. For example, if you are swapping X to Y, you probably want to swap I to J and U to V (Fanucs lets you use UVW as relative versions of XYZ so you needn't keep switching modes). One click saves you some time. This related axes option is not something I've seen in other editors, but it sure makes sense if you had to do this sort of thing very much. Note that the swap is one way unless you specify both directions. So if you truly want to swap X and Y, you would put X to Y as one line and Y to X as the other. The related threads I linked to had some good tips on how to go about this type of programming. In particular the first tip also mentions that at least for one machinist, they had to switch G02 for G02. I thought about adding a checkbox to automatically do that as well, but hadn't seen any other examples where it was necessary so left well enough alone. If someone who does a lot of right angle head programming wants to suggest further additions to the function, drop me a note. BTW, it does kind of bake your noodle a little bit to think about programming a right angle head, but it isn't so bad if you just think of doing it in the normal XY plane and then use a capability like this swapping to move it to another plane. Read through all the links I gave before you attempt it, there's some good advice in them. What to read next Enough editing! It's time to learn G-Wizard Editor's g-code simulator and debugger.
|
||||||||
|
|
|
|
|
|
|
||
|
|
|
|||||||


